
Top 5 Ranking Web 2.0 Blog Sites List For SEO And Tutorials [Updated 2023]
- Jul 20, 2018
- 10 min read
Updated: Jan 24, 2023
Dominate your keywords or brand awareness with our top site web 2.0 blogs. In this blog post, we will focus on building mini-sites with quality. And what does it mean by that? It means they need to be highly optimized, legitimate look, a good looking mini-site, unique and readable content, frequently updated, etc.
Lot's of marketer or SEO are engaging on web 2.0 as part of their daily link building ro2utine. But, sad to say that they are abusing web 2.0 blogs for ranking keywords and branding. This abuse must have a negative effect in the future. And that's why we are here to help you guys avoid the negative effect in the future. You're creating a site or blogs without any optimization, good content, updating, or should we say no traffic at all, what it's going to happen? It's a terrible idea. It's not a worth value if you're creating a web 2.0 without any readers or traffic on it. You're just like creating a huge building without any cement foundation. To make sense, we are going to introduce how positive network can benefit your web 2.0.

Positive Web 2.0 Network
1.) Social Signals - It's vital that your web 2.0 have some social's share of any popular properties such as Twitter, Facebook, Pinterest, Google +, etc. Check our example below, and it has 200+ social share in the report. The key here is to develop social sharing as part of the ranking factors.

2.) Traffic Popularity - Believe it or not, but we do believe that traffic or what we called CTR is part of the ranking factors. So, if you have a web 2.0 network, you better send them traffic for direct, referral or organic search. You can see the image below as we did some test from our organic traffic service. So, we do have post & pages traffic, referrers, direct, etc.

3.) Related Niche Or brand - We need to clarify things here if you're building for your brand. Then, you should be using your brand name as your niche or sub-domain names. If you're ranking for specific keywords, then you go with niche related sub-domain which mean you will have to create related to your money site. For example, your niche is about digital marketing, and then you build your network like "seotipscompany" "digitalonlinemarketing" etc. Keep in mind that niche and brand are different. See example below:
Brand - https://hybridtraffic.wordpress.com
Niche Related - https://healthnewsblog2017.wordpress.com
4.) Social fortress - To obtain high authority sites, you should also build a social fortress for each of the web 2.0 that you have. If you think, it will need to take a lot of time and patience when doing this. A small amount of link will do, let's say you can start with 50 social profile links for per each 2.0. Why do we need social properties to link in web 2.0? The answer is simple: to increase your web 2.0 network visibility, more spots in google listed, indexing rate increased. So, overall it will increase your web 2.0 power and referring domain. It should focus more on branding if the web 2.0 that you're targeting is Ex. https://healthnewsblog2017.wordpress.com, then the username of the brand name should be "healthnewsblog2017". So you will have https://facebook.com/healthnewsblogs2017, https://twitter/healthnewsblog2017. You can check for starter site links below:

Facebook
Twitter
instagram
youtube
vimeo
dailymotion
Google +
linkedin
pinterest
Tumblr
Moz
About.me
Reddit
kickstarter
Quora
pocket
instapaper
Trello
Diigo
Alternion
feedspot
Flickr
Foursquare
Periscope
Medium
Soundcloud
udemy
Slack
Knowem
Bizsugar
Stumbleupon
meetup
Digg
Twitch
github
Skyrock
wattpad
coursera
disqus
issuu
storify
academia
scribd
gravatar
ted
last.fm
myspace
dpreview
5.) On-page optimize - Proper on-page optimize for each of the networks, Notes: some of the web 2. has different setup or optimization, some needs payment before you can optimize. So be sure that you optimize the on the page like the h1, page title, meta description, alt text, tags, categories, social links, landing pages about|contact|home|Blogs, link wrapping of personal links and blogs, etc. You can check the list of highly optimizing web 2.0 below:
https://doorbelladvisor.wordpress.com
https://doorbelladvisor.tumblr.com
http://boardemporium.wixsite.com/longboardforgirls
https://boardemporium.blogspot.com
6.) Updated content - Of course, content is the king. So, better write good content that will make sense, it doesn't have to be high quality to spend like $10 - $20 per content, it should focus more on readability and uniqueness. Then you should be updating the content regularly in your web 2.0 network like 2 - 3 per month.
6 Reason why we love Web 2.0 as Part of our link building strategies
1.) Good for branding - As SEO hacker mentioned in his blog post, it's designed to take branding of your website. Read More.
2.) We control the network - Yes, we can control the network, we can add our images, manipulate the anchor text distribution, removing, adding tags, personalized themes.
3.) We let it grow like a real blog - We let it grow by itself, by feeding quality content, time to time, viewers increasing, metrics are increasing.
4.) For long-term - If you take them seriously, they will survive for a long term. We had our accounts created way back 2014, and until now it's still alive and kicking. PA increased to 40 +.
5.) Domain and Subdomain - My favorite part. It feels like you can use all of the features, but the only difference between free and paid is the domain name or sub-domain names. If you take a better look at it. They're just the same. The same starting point, same set up, optimize. You have to win with the content and how you will deliver your marketing.
6.) 100% Contextual backlinks - As we can see every web 2.0 network has the ability post blogs and that's what we're looking for. Real contextual links in optimize anchor text.
Let's get started with the list!
Top Web 2.0 site list
Domain authority: 100
Page Authority: 96
Trust Flow: 73
Citation flow: 79
Indexing rate: 100%
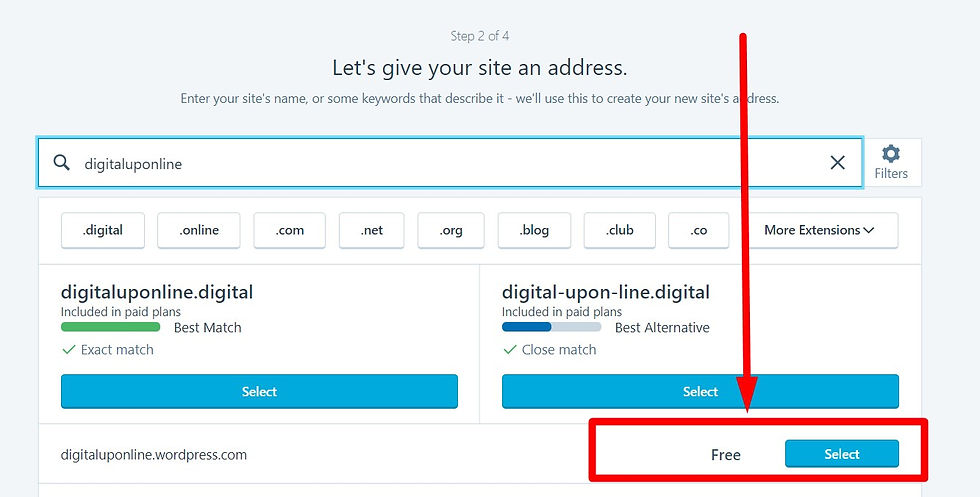
Go to WordPress and click on "get started."

Then, you will be redirected to fill up some form.

Once you click on continue, you will be on step 2 of 4, and this is where you decide if your focus is branding or niche related. Once, you selected a sub-domain name, just click on select free.
Step 3 is to choose your plan. You can start with free blogs/website.

Step 4 is to create your account. Be sure to activate the account in your email that you registered.

Optimize your profile to look more legit. Add some logo or photo, name, about me.

Now, let's move on optimizing your site. Click on "my site" dashboard.

Click on your settings, and you can optimize your site title and site tagline, make sure you set your site in public for the view-able link.

next step is to customize your page, header image, widgets, etc.

You may now optimize your logo, header, fonts, adding widgets, add and optimize to make it looks good and entertaining. Then don't forget to hit the published button.

Once you're done, you may go back to your site dashboard and add some site pages to look more real. You can add a contact, about, services, etc. Then fill them up with some content or description, photos, video, google map, social links, etc.

Click on the add blog post and write about your niche, add some alt text, add photos, videos, google map ( optional ), anchor text as generic or branded. Add authority links like the wiki, wikihow, ehow, Forbes, some popular blog content.

And you're done, from time to time you need to update or add some blog post. Treat them as part of your priority network.
Domain authority: 97
Page Authority: 97
Trust Flow: 82
Citation flow: 86
Indexing rate: 100%
To get started, go to the blogger site and click on create your blog. If you already have a Gmail or Google + account, then you can sign in automatically using your account.

Once you're already signed in, you will be redirected to your page account, and you will need to fill up the title, address ( sub-domain name) this could be your brand name or niche related/keywords. So, I am targeting my brand and doing awareness, so I used my brand name which is the hybrid traffic. Then you can choose your themes. There are 11 themes that you can choose.

Once you're in your dashboard, click the settings and click on the basic. This is where we optimize our basic set up. You can optimize your title and description. Add a unique description and cache title related to your niche. And then, click on https as yes.

You can skip the themes, or if you want to change any of your themes, then you can do that by going to your theme.

Next is the layout, now, you can optimize your page according to your style and widgets. You can click +add a gadget, and you can move it to the sidebar. You can add your followers, link list, attribution, contact form, logo, feed, image, profile, etc. and lots more to choose. My favorite part in there is to add my link list as I can add my social properties and other blogs like About.me, Facebook, Tumblr, Twitter, etc. you can do that by adding a gadget and choose "Link list."


Once you're done optimizing your layout, then you can move on to pages, you can add landing pages like about| services| depends what you improve.

The last but not the least is the blog post. Go to your post and click on "new post." You can add your title, body, images, google map embed, anchor text link, content, etc.


Domain authority: 93
Page Authority: 95
Trust Flow: 80
Citation flow: 66
Indexing rate: 100%
To start, go and click on sign up. You can fill up your name, address, and password or you can continue signing up using your facebook or google account.


Once you're done signing up, you need to activate weebly in your email and click on the activation code to activate your account. Then you will be forwarded to your dashboard and click on edit site.

The first thing you need to do is to go to your settings tab.

Optimize your site title and site category according to your niche in your "General tab."

Go to SEO tab and optimize your site description and meta keywords. Don't forget to hit on save.

Next step is to go to your page and create some pages like about, contact, services, etc. make it look good and natural.

Click on the small paper to edit or optimize your page. Check on visibility tab and be sure it is set on a public viewable. Then go to your SEO settings tab and optimize your page title, page description, and meta keywords.


Now, you're good to go. You may now edit your page by clicking your build tab. You may now add some title, images, gallery, map, slideshow, contact form, media, products, categories, social icons and lots more. You will need to have a good designer or maybe just a little skilled in using some of the editor tools. Once, you're done. Don't forget to publish your site and it will start indexing some of the pages that you have created. Don't forget to add some blogs too.

Domain authority: 92
Page Authority: 94
Trust Flow: 81
Citation flow: 65
Indexing rate: 100%
Let's start by clicking the get started at the center. You can continue using your Facebook or Google account, or you can sign up with your preferred email. I always choose login with my Google account so that it will automatically create an account for me and no need for an activation code.


Once you're in, they will redirect you to let's get started, skip it.

Then you will need to choose how you want to create your website. Now, we prefer the 2nd step by choosing our template, the drag and drop design features. It makes you feel like you're creating and designing your website. So, click and select your template.

You will be redirected to your website template dashboard, and you can finally search or pick your website template depends on your niche. They have new, most popular and blank templates. There are also by categories. There are hundreds of website templates to choose from so pick the best one or easy to navigate and to redesign.

Now, you can edit or view the template first. Once you like the template then, start it by clicking the edit site.


Once you're in the website editor, the first thing you need to do is to change your H1, H2, landing pages, add some content, make them look good. You have to drag and drop. It will take so much time, but the finished product should be looking good and professional look.

Then, you can set your social links too. Once you boost up this wix, all of your social accounts will gain benefits and power-ups. You can add more icons and social, setting title text and links.


Go to your tool and choose social to add social links to your website.

So, we already did optimize the whole dashboard, and we got here our h1, social links, content, landing pages, post categories.

Next step is to optimize your page, by going to your site menu, click the three dots and click page SEO. Now, you can optimize your page title, page description, and page keywords. You can input your keywords ranking if you're ranking for specific keywords or brand name as the title and a little description on the page. We always use web 2.0 as a brand name, some SEO marketer abuse it and use it for ranking keywords. If you want to stay cool and for long-term results, then go for branding.


So, we are now ready to publish our super quality and optimize web 2.0 blogs wix, click on the publish once you finish editing and setting up. Just wait for it to be index in google for a couple of days and you're done.

Domain authority: 99
Page Authority: 96
Trust Flow: 87
Citation flow: 90
Indexing rate: 100%
The first move is to click the get started in the middle. Fill the form with email, username, and password. Tumblr will automatically choose available usernames. Be sure to have your username unique or much better to use your brand name.


Once you are done signing up, be sure to click the given activation code in your email for standard verification. Then you will be redirected to your dashboard Tumblr. The first thing you need to do is to edit your appearance and optimize it.

Click on edit appearance, then click on the small pen to change to your cover photo and logo. You can also change your title as your brand and description, then don't forget to hit on save.


Next step is to optimize your theme. You can add your avatar, background color, accent, show title or description, font, header, pattern style and lots more. This is web optimization to make your blog a good looking one and to show it a legit one. Once you're done optimizing, then you hit on save.


You're all set! The next move that you're going to do is the posting. Go back to your dashboard or home. Tumblr is a very powerful link that you could get for your website, and you can choose and create an article, add a photo, direct links, audio, and video. We always do the article posting and links.

Click the text article, input your content title, body, add images, video and tags. Just highlight the word or keywords to add URL link or CTRL+K.


If you're sharing some links, blogs post, PBN post, guest posting, web 2.0 blogs, etc. then you can click on the direct link.


Tumblr is a very power backlink, you will have all your post in your homepage, and if you know how to build links on it, it will become more powerful. All the links and articles will gain juice power up. Try to make tier 2 links on it like niche quality blog commenting, PBN with traffic, authority links, web 2.0 high PA, socials, and traffic. Always remember, quality is better than quantity. You can check more free backlinks and tutorials.
Comments